![]()
Activities
News

CSA LS-4a User Guide
This document is not a substitute for the Rolladen-Scheider Owners and Maintenance Manuals. These manuals should be read and understood prior to CSA checkout for the LS4a, 3W. This manual provides additional information describing peculiarities of 3W and additional care each pilot should address for each flight. This manual will cover:
- Supplemental Equipment Location and Use
- Inspection of L’Hottelier Connection for Ailerons and Dive Brakes
- Inspection of Elevator Connection
- Oxygen Tank Filling, and Personal Mask Requirements
- Properly Opening the Canopy
- Pre and Post Flight Cleaning
- Wing Tip Skid Repair
- Brief Zander Flight Computer Instructions
1. Supplemental Equipment Location and Use
A red main pin bag resides in the baggage compartment. This bag contains two plastic tubes which should be used to store and protect the main wing pins when 3W is disassembled. The pin bag also has a copy of the LS4a Owners Manual and a CSA owned oxygen mask in the large pocket. This pin bag the items described above must be stowed in 3W for each flight. A short, wide- blade screwdriver must also be stowed in the side pocket. This screwdriver is required for disassembly of the horizontal stabilizer. If the pilot removes the flight manual or oxygen mask for in-flight use, they must be returned to the pin bag after the flight is completed.
2. Inspection of L’Hottelier Connection for Ailerons and Air Brakes
| It is very important to ensure that the L’Hottelier connections for the ailerons and spoilers are correctly connected and the red safety collar is in its proper position. These safety collars have a standard right had thread (clockwise engages the safety collar). These connects should be checked before every flight. The diagram to the right (from the LS4a Flight Manual) illustrates a properly coupled and secured connection: | 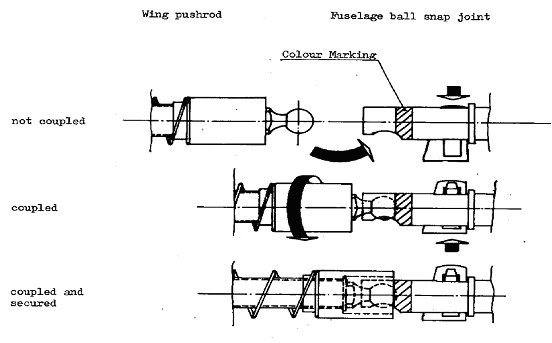 |
| The photographs to the right illustrate what these connections look like. Note that there are mirrors on the bulkhead behind the control connections to aid in inspecting them. When properly connected and secured the spring pin is in the up position, the safety collars are positioned toward the center of the fuselage and the end of the pushrod should not be visible. | 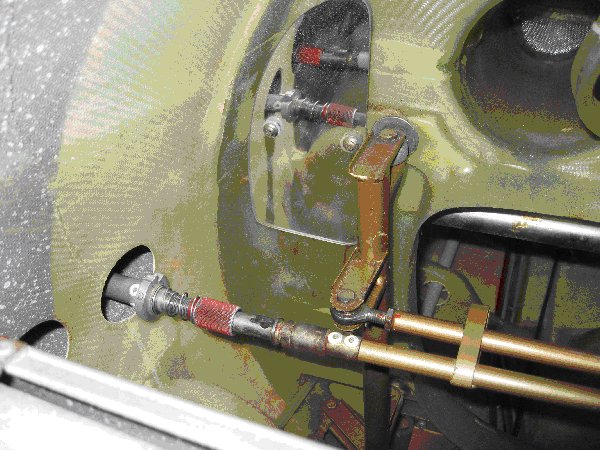 |
| Note that the collar should only be hand tightened and it takes many turns to get the collar into the proper position (~20). Make it snug but not real tight so as not to make it difficult to loosen later. | |
3. Inspection of Elevator Connection
Per the owner’s manual, the red painted surface on top of the bracket where the thumb wheel is found should be almost completely covered. In this position the thumb wheel should be quite snug, but not overly tight. Over tightening will cause the stabilizer mounting pin sockets to expand (which will require eventual replacement of the sockets)
The forward ball socket should NOT be loose. Do NOT loosen and or lube it. The manuals require it to be “cemented in place”.
4. Oxygen Tank Filling, Use and Personal Requirements
The oxygen tank is filled via the main valve on the oxygen tank. You must have a CSA oxygen cart checkout before filling the oxygen tank. You must also know how to install and use the proper oxygen tank adapter. To fill the tank the oxygen regulator must be removed. Removal and replacement is done by hand without the use of any tools. The oxygen tank must be turned off after each flight.
It is recommended that each 3W pilot obtain a personal mask, Oxysaver cannula or regular cannula with an Aerox flowmeter an Aerox barb insert connector (male) for connection to the regulator. (These items can be obtained from www.wingsandwheels.com.)
5. Properly Opening the Canopy
3W has seen quite a bit of use in its life and the canopy hinging mechanism is not as tight as when it was new and easily binds on (and deforms) the air vent and other items if improperly opened. To open the canopy, reach inside the access hole and release the locks on each side of the canopy frame. Then slightly lift the canopy by grasping the locking rods. DO NOT completely open the canopy with this grasp! Raise the canopy only enough such that you can place your right hand under the center-top-rear of the canopy frame. Complete opening the canopy by lifting on the rear canopy frame so that it goes straight up. Close using the reverse procedure.
6. Pre and Post Flight Cleaning
Before a day’s soaring 3W should be washed to remove hangar dust. Use a large, highly water soaked sponge to “flood” excessive dust and dirt from the surfaces. Do not dry wipe or use a damp sponge as this will scratch the gelcoat. Dry 3W using a clean soft towel or chamois once the water has dribbled off. There is a bucket, sponge and chamois in the 3W box at west side of hangar. (Keep the chamois rinsed free of dirt.) As a pilot of 3W you should have your own bucket, large sponge and supply of towels/chamois. At the end of the soaring day, the wing, nose and tail leading edges need to be cleaned of bugs and such before 3W is returned to the hangar.
The canopy should be carefully cleaned at the beginning of the day. Generally, just use a light spray of Brillianaize cleaner and a soft cloth to clean smudges from the canopy. If there is a significant (noticeable) amount of dust or dirt on the canopy, first rinse it off with a bucket of clean water. It can then be “pat” dried with a soft cloth and cleaned normally. It is best to keep the canopy cover on 3W at all times except for flight. Before takeoff fold and place e canopy cover in the baggage compartment.
7. Wing Tip Skid Repair
The wing tip skids on the LS-4a are attached with contact cement. On occasion, these are knocked off. This is intentional in the design since they are usually only knocked off when the wing tip strikes the ground in some unusual manner and this absorbs some energy which might otherwise have damaged the wing tip. However, if a wing tip skid does get knocked off, the LS-4a should not be flown until the wing tip skid is replaced and the wing is thoroughly looked over for other damage which might have occurred. It is not difficult to replace the wing tip skid. Following is the procedure to do this:
- Contact the LS-4a Crew Chief so he/she can ensure the wing is examined for other damage
- What you need before starting:
- Wing tip skid - Hopefully the skid that was knocked off was actually found in the take-off or landing area. If it could not be found, contact the LS-4a Crew Chief who may have a spare or will know how to get one.
- White gas or Xylol - There may be some in the south hanger but you can get this at a hardware store.
- Contact cement or Pliabond - While there may be some in the south hangar this stuff usually dries out after opening so you may have to get a bottle at a hardware store.
- Paper towels
- Sharp pencil
- Cleaning the old contact cement off:
- Saturate a a bit of a paper towel with White gas or Xylol and soak the old contact cement and let it sit for a minute.
- Soak the paper towel again and then start rubbing the old contact cement off. This is going to need to be repeated several times to get it all off.
- It's easiest if you clean the wing tip and skid one at a time.
- Note that you will not be able to get all the discoloration from the contact cement off the gel coat of the wing tip.
- Gluing on the replacement wing tip skid:
- Using the pencil, lightly trace around the wing-tip skid when it is held in position where the discoloration of the gel coat is located.
- Put an even coating of contact cement on BOTH the wing tip skid and wing tip in your penciled area.
- Wait about 15 min for the contact cement to get tacky (read instructions on bottle), then push the wing tip skid on firmly, shifting pressure fore and aft on the skid.
8. Brief Zander Flight Computer Instructions
The Zander 940 flight computer has many functions to help you fly FAI and competition tasks. Some of these include setting up routes and helping you successfully round turnpoint using FAI sectors. For a complete description of how to use all of the features see the SR 940 manual. Following is a basic overview of the SR940.
Zander SR940 User Interface
 |
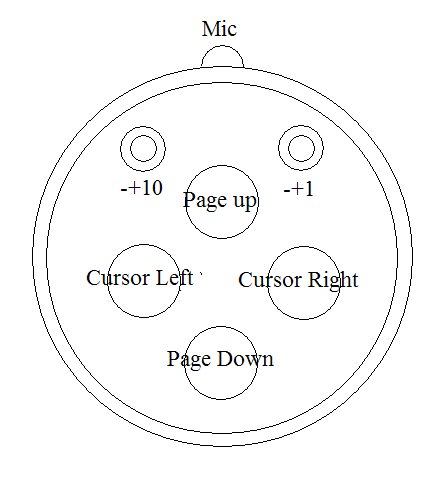 |
| SR940 Flight Computer Interface | Corresponding Control Stick Function switches |
Function of SR940 face switches left to right:
| Toggle +1 / -1 | Change value under the cursor by +1 / -1 |
| Toggle Cursor down/up | Moves cursor one line down or up. |
| Toggle Page forward/backwards | Changes the total text on the display |
| Switch Vario-Auto-Speed Command: | Sets the mode of the glider computer |
| Toggle -+1 Cursor together | Change value under the cursor by +10 / -10 |
| Toggle Cursor & Page together | Volume increase / decrease |
| All toggles and toggle combination have repeating/continuous function. | |
| Toggle -+1 Page down together | Reset (-R-) stopwatch to0 0:00, clear Statistics and set route leg to 0 (Start) |
| Toggle -+1 & Page up together: | Stop watch and statistics stop (Finish) |
SR940 Function Organization
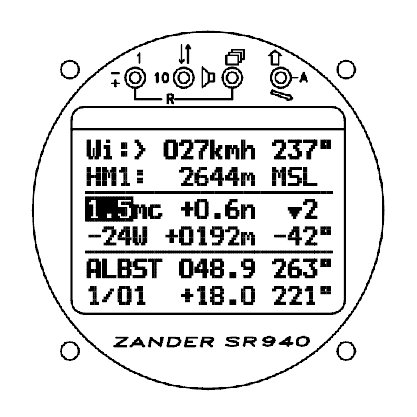
The functions of th SR 940 are organized in screen pages and sub-pages. The main or Flight Page is shown in the diagram above (left). The Flight Page (page normally used during flight) is divided in three windows.
- The upper window has two lines of information which can be selected from a list of about 27 different info lines.
- Examples: altitudes, winds, clock, temperature, graphical heading error, average limb-L/D, etc...
- The middle window shows fixed information:
- MacCready setting, climb rate average, speed command information
- Glidepath calculator wind component, height and deviation from glidepath,
- The lower window shows GPS information:
- Next waypoint name, distance and bearing to waypoint
- Selected route and leg, offset from course line, track over ground
By moving the cursor to some of the different items on the Flight page you can settings or jump to other pages to get more information or change settings. Key examples:
| Info line 1 | +/- 1* will step you through the info lines. A nice one to have is the GPS wind (from) direction and speed |
| Info line 2 | +/- 1* will step you through the info lines. A nice one to have is the clock/stop watch |
| MacCready | +/-1 & +/-10 will change the MacCready setting. A good number to set this to is 2.0 before takeoff. Page Forward will take you to page 5 where you should set wing loading (~7.0 lbs), best L/D (30 to be conservative) and current altitudes (ground) before takeoff. |
| W (wind) | +/-1 & +/-10 to adjust the wind, especially for a final glide. A negative number is for a headwind. |
| Waypoint Name | Page forward to see the waypoint information |
| -Reset-/Departure | The face shows two toggles to push down at the same time. This will reset the stop watch and advance the waypoint name to a number by one which will also cause the waypoint name to show the waypoint for that leg |
| Leg Number | + advances to the next leg/waypoint, - restores previous waypoint. Page Forward to the waypoint list page |
| Route Number | +/- will change the route as several can be set up. Page Forward will take you to page 11 to set up and edit the current and other routes |
* You can also get an explanation of the current info line with Page Forward
Note that once you use Page Forward, you can return to the Flight Page using Page Backward.
Hopefully, the previous pilot has left the SR940 with a route where the first point is Owl Canyon and this is displayed when you turn it on. If you are flying locally it is nice to have this set before flight so that you can always see you minimum height to return to OCGP.
There are many other things you can do from the flight page, like see the remaining distance on course, or set the wind from the GPS calculator. There are also many other pages with interesting information and settings. For instance you can go to a page which will show the closest 9 airports, another does this graphically. There is a page which shows your location in reference to a turnpoint, both for cylinders used in contests and FAI valid sectors for badges and records. There's a page to show you graphically the proximity to special airspace.
The easiest way to get to other pages is to first jump to a page as above, say the MacReady page, then use the +/- toggle to change the page number, which is where the cursor should be by default. Also some pages will have numbered functions which you select with +/- 1 to change. For instance on the route page there is a number which you use to select clear (1), select (2) and insert (3) waypoint. When there is a field like this (i.e. 1 = clear = NO), after you have the setting you want, you move the cursor to the next position (NO) and use +1 to select YES and perform the function.
This is just a touch on what the SR940 can do and how it works. The best thing to do is to download the manual and the manual update to learn more about all of the functionality within this flight computer.
GP940 Flight Recorder
The GP940 is the flight recorder and GPS accessory for the SR940. To download your flights you will need a download program which is part of the.Zander PC Software package. Once the software is installed on your laptop, connect the laptop to the flight recorder with a standard 9-pin serial cable. Run the WinZAN program which will give you many options. First you will have to select the WinGP02.exe program to run. Then use file->flight data->read from GP and save as Zan File to download your flight which should be at the bottom of the flight list. After downloading, you will be offered the opportunity to convert the file to IGC format. Do this conversion. While there is a flight analysis program (WinAW.exe) in the package, it only analyzes Zan files in metric units. You will probably want to use some other program like SeeYou to analyze the flight and these programs will need the IGC version of the file. Also you will need thee IGC file if you want to post it to the OLC.
You will also notice that you can upload and download turnpoint files and routes to the GP940. If you do this, make sure you have the original waypoint file so you can restore the the GP940 to its original state for OCGP (i.e. download what is in it first). Turnpoints and routes loaded into the GP940 can be transferred to the SR940 using the SR940 FD Recorder page (21). While it is possible to directly connect to the SR940 for data waypoint and route transfers, this requires a bit of re-cabling and re-configuration of the SR940 and should only be done by very experienced users in very rare cases (i.e. just don't do it).
It is also possible to connect to the GP940 using a PDA. There is a Zander program for an IPAq which is a bit complex to install (see Aland if you want the program). An alternative is to use ConnectMe from the SeeYou folks which is easier to install on many more PDAs and is free. You will also need to figure out how to construct/obtain the appropriate serial cable for your PDA.
PDA connection to the SR940
There is a short GPS output serial connection cable from the SR940 Flight Computer which can be used to provide GPS data to a PDA running soaring flight software such as WinPilot or SeeYou Mobile. The SR940 manual documents the pin configuration of this cable. Aland has configured a couple IPAQs successfully to use this data so you may want to contact him before attempting to do this.
Updated 05/24/2014
Previous page: Roladen-Schneider LS-4a Sailplane
Next page: Schweizer SGS 1-26E